Tutorial Papercheck
Introduction
To test the printer settings with a new photo paper to get the best results, you may as described in this tutorial approach.Create a new Papercheck

- Put over the button
 or over the menu File/New/Papercheck a new paper test on.
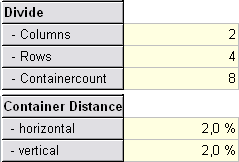
 - As initial value 8 containers are fixed in two columns and four rows. These values can change you in register Imagedata under Divide.
The number of sides will become automatically on the base the entered values computed and the containers between the sides moved. The printer options of the containers remain. - The distances between the containers and page margins specify you under container Distance in register Imagedata. 2,0% are preset.
Select a Image

To take a image, you have several options:
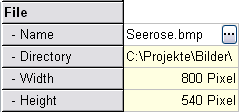
- In register Imagedata under File/- Name use the
button  .
. - By "Drag & Drop" pull exactly one image file from the Windows Explorer on the Papercheck.
- If the Papercheck is stored, and a link in the "Send to" have created.
Printer Options
Now you make the printer options for each container. Select in addition the containers successively:
 With the right mouse button you receive the context menu of the container immediately, in which you select the point Container Printeroptions.
 For the currently selected container you can use the printer dialog box for setting container on the menu Printer/Container Printeroptions or in register Printerinformation under Printer/- Name over the button
  .
.
If no container selected, the printer dialog box for project printer settings is starting.
If a printer setting between portrait and landscape changed, this change also on all other printer settings.

Assign in register Printerinformation or Imagedata under Description/- name an optional entry, with which you can identify the attitudes of the container.
Save the Papercheck
Save the paper test under a descriptive name. You will then receive in the future for test papers comparable results if you use paper test again. If you have multiple Papercheck created, you should save they in a separate folder.Do a Papercheck

Start the Papercheck over the menu Printer/Print Project.
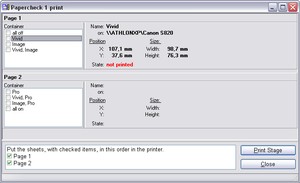
Page Name
The name of the individual project side.Container List
The list of the containers of the individual side. Printed containers are marked.Container Informationen
Information to the selected container. Select a container in the Container List to see the related information.Pagelist
Here you see in what order must be inserting the pages into the printer.Print Stage
With this button the next print stage is started. For each side a container is printed. The container, which is printed straight, is characterized in the container list and in the state field.Close
This cancel the Papercheck prematurely.Hint
The size of the container list and the sheet sequence can be changed with the mouse.
Proceed
- Put enough paper in the printer.
- Start the printing with the switch "Print Stage".
- After the stage is printed, sort the sheets according to the indicated order and start the next stage.
- Repeat the previous point, until all stages are printed.
- After the final round was printed, is an indication of dialogue reinitialized to start next test them.

 or over the menu File/New/Papercheck a new paper test on.
 To take a image, you have several options:
 .
. With the right mouse button you receive the context menu of the container immediately, in which you select the point Container Printeroptions.
 For the currently selected container you can use the printer dialog box for setting container on the menu Printer/Container Printeroptions or in register Printerinformation under Printer/- Name over the button
  .
. Assign in register Printerinformation or Imagedata under Description/- name an optional entry, with which you can identify the attitudes of the container.
 Start the Papercheck over the menu Printer/Print Project.