Tutorial Stereotype
Introduction
It describes how you have multiple pictures at once can print. This allows e.g. all images of a directory in the same format can be printed.Create a new Stereotype
Create over the button or over the menu File/New/Stereotype a new Stereotype.
Use the Index Stereotype Generator (over then Menu Tools / Create Index Stereotype) for a simple way to create a stereotype with image rows and columns.
Create Image Containers
If you want to print a Image with maximum size and same edges per side, put on the image container as follows:- Activate the image container mode with the button
 or press [Ctrl + Alt + B].
 - Drag the mouse on any part of the canvas to produce a image container.
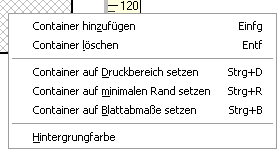
 Click with the right mouse button on the container and select "Set Container to Minimal Border". Since the container is after providing the active container, you can also use the combination of keys [Ctrl + R] to set the container size.
The container now has the maximum size with minimum edge equal in size at all sides.
If they want to print several images for each side you will later cut, distribute as many image containers on the side like you to need.
Start over the menu Printer/Pageprinteroptions the printer dialogue and configure the printer.
 Provide for all containers in the register Imagedata under Automatic"- Imageorientation" up "maximum size (to the left)" in order to fit the image in with maximum size into the container. Set "- Print empty" yes around also the latter to print possibly incompletely filled side. Alternatively can you for "- Imageorientation" also adjust landscape or portrait format. With (to the left) and (to the right) specify the direction of rotation, into which if necessary the image is to be turned.
Save Stereotype and Create a File Link
Store the template under a meaningful name. If you provide several Stereotypes, it is advisable to save all in the same folder. Over the menu Tools/Edit Links in "Send To" start the editor for File Links. With the button
  you create a new File Link.
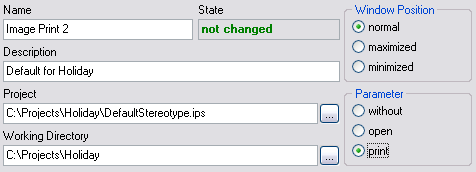
- Specify a Name and a Description.
- Under Project you register the Stereotype just provided. Use the button
 around a file dialogue for looking to open.
 - Specify a working directory. You can also here over the button
 open a search dialogue.
 - For testing it is not to be set meaningful the window position on minimized, so that you can observe the procedure.
- Set the parameter to print. Thus the handed over images with the provided stereotype are printed.
- With the button
 you save the file link.
Specify images which can be printed
Around images over the linkage put on to print you have several possibilities:- Mark in the Windows Explorer one or more images and call with the right mouse button in the marked pictures under "Send To" the provided File Link.
- Mark in the Windows Explorer one or more directories and call with the right mouse button on the marked files under "Send To" the provided File Link. All images in these directories and subdirectories are printed.
- You can send also images and directories mixed to the file link.
- Over the search function in the Windows Explorer you can search images and directories to print over the provided file link.
